This post may contain affiliate links. As an Amazon Associate I earn from qualifying purchases at no extra cost to you. Click HERE to read my policies.
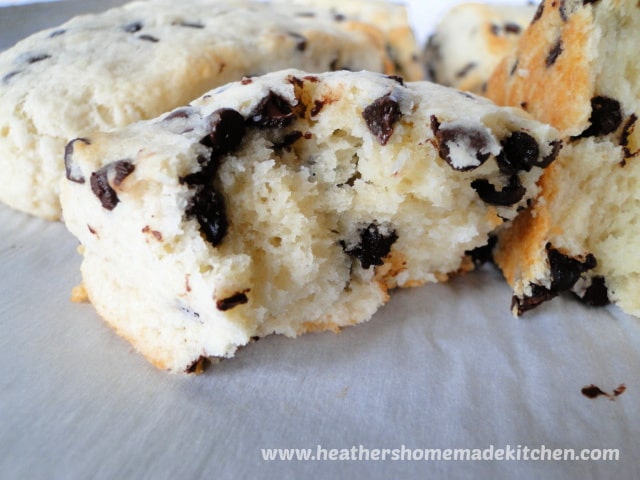
These buttery and flaky Chocolate Chip Scones are delicious slightly sweetened biscuits that are packed with mini chocolate chips. They are perfect for breakfast, snack, and packed in lunches.
These little babies are my kids' all time favorite scone. We love scones for breakfast and snack time, but these are so heavenly they would even be tasty enough for dessert! If you have never tried making scones from scratch, now you can with this simple recipe. These Chocolate Chip Scones are so worth the "little bit" extra time to make them homemade. When I say "little bit" I mean only like an extra 10 minutes to get these in the oven, rather than using frozen dough or buying them ready to eat from the store. So completely worth it. Trust me!

This post was originally posted on 6/19/2019 and updated on 8/18/2020.
What's in Chocolate Chip Scones?
- Unbleached All Purpose Flour
- Sugar
- Baking Powder
- Cold Salted Butter
- Milk
- Pure Vanilla Extract
- Mini Chocolate Chips
Do I have to use mini chocolate chips?
Nope, you can use regular chocolate chips. I like to use mini chips because they distribute throughout the dough better and are easier to cut through when cutting the dough. Plus, I think they look prettier with the mini's. If all you have is original chocolate chips, by all means use them. The scones will still taste great!

How to Make Chocolate Chip Scones From Scratch
There are only a few steps until these perfect scones are out of the oven and in your mouth.
First, in a large bowl combine the flour, sugar and baking powder. Next, cut the cold butter into pea size cubes and add it to the flour mix. Using a pastry blender or your fingers cut the butter in until it resembles course crumbs.
Now, add the milk and vanilla and using a rubber spatula fold it together just until combined. Then fold the mini chocolate chips into the dough with your hands just until incorporated and the dough has come together.
Shape the dough into about an 8 inch circle on a parchment lined baking sheet. Slice the dough into 8 pieces and arrange on baking sheet 2 inches apart.
Bake the scones in a 375° oven for 15-18 minutes until the edges are just starting to turn golden. Let the scones cool completely before storing.
Make a double batch and freeze them! They freeze very well and can be pulled out for an easy breakfast or snack. They also are great packed into lunches. I pack lunches the night before and just add the frozen scones to the lunch box and place in fridge until it is on the way to school with the kids.
How to freeze scones?
Once the scones are completely cooled, place them in a freezer safe air tight container or zip top bag. Label and date the container or bag. These scones will last in the freezer for 3 months.
To thaw the scones, take out 15 minutes before needing them or take out the night before and let thaw covered on counter.
Tips for making the best scones
- Use cold ingredients. Cold or even frozen butter and cold milk. Using cold ingredients helps create the flaky tender crumb scones are known for.
- Use your hands or pastry blender to cut the butter into the flour, leaving sheets or clumps of butter.
- Work quickly once the butter has been cut in. The butter needs to be as cold as possible when it goes into the oven, that is what creates the flakiness of the scone.
- Do not over mix or over work the dough, it will create tough and heavy scones.
- Fold the dough to bring it together. Folding the dough helps create layers and prevents the scones from being dry.
Here are some more baked goodies you might like to enjoy for breakfast, snack or pack in lunches.
- Double Chocolate Chip Scones
- Banana Nut Muffins
- Chocolate Chip Zucchini Bread
- Easy Drop Biscuits
- Banana Scones
- Chocolate Sour Cream Baked Donuts
- Easy Homemade Bagels
Give these delicious and flaky Chocolate Chip Scones a try and let me know how much you enjoyed them in the comments below! Pictures encouraged on Instagram with the hashtag #heathershomemadekitchen You can also follow me on Social Media to see what other crazy things my family and I are doing! If you like what you see, please share with your friends and family!
Don’t forget to pin the recipe for later!

Chocolate Chip Scones
Ingredients
- 2 cups unbleached all purpose flour
- ⅓ cup sugar
- 2 teaspoons baking powder
- ½ cup salted butter, cold
- ½ cup cold milk
- 1 teaspoon pure vanilla extract
- ¾ cup mini chocolate chips, any variety; milk, semi-sweet, dark, etc.
Instructions
- Preheat oven to 375 degrees and line a baking sheet with parchment paper.
- In a large mixing bowl, whisk together the flour, sugar, and baking powder.
- Cut the butter into pea size. pieces
- Add the butter to the flour mix and using a pastry blender or your hands, cut the butter and flour together until it resembles course crumbs.
- Add the milk and vanilla and fold together just until combined.
- Add the chocolate chips and fold them into the dough using your hands just until incorporated and the dough comes together.
- Turn dough over onto a parchment lined baking sheet and pat into an 8 inch circle.
- Slice the dough into 8 triangles like you would cut a pie or pizza. Arrange triangles on the baking sheet about 2 inches apart.
- Bake for 15-18 minutes or until the tops and edges are just starting to turn golden brown.
- Let cool completely before storing.





Christine Wilcox says
Once I followed directions and was ready to cut the dough it was so gooey. Is it ok to refrigerate it till its firm enough to cook?
Heather Warburton says
Sure! If it's too gooey, you can add a tablespoon of flour at a time until the dough is workable. Be careful not to overwork the dough. It should be a little tacky, but still able to hold shape and be handled. Hope that helps.
Kiera says
I was just looking for a quick recipe for scones that was also limited ingredients. Yours looks delicious I will definitely be trying them very soon!