
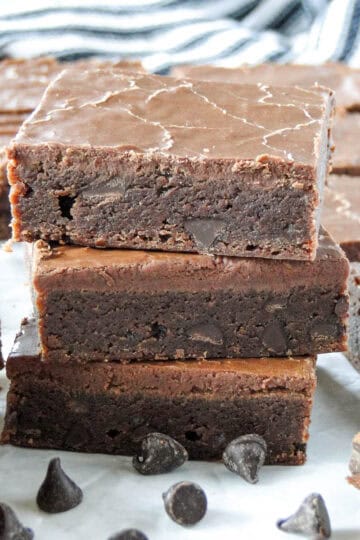
Classic Homemade Brownies are rich, decadent and have the best crisp edges with a fudgy center! A simple one bowl recipe makes these homemade brownies a breeze to whip up!

This post may contain affiliate links. As an Amazon Associate I earn from qualifying purchases at no extra cost to you. Click HERE to read my policies.
This post was originally posted on 2/5/2021 and updated on 8/21/2024.
Why We Love This Brownie Recipe with Cocoa Powder
- It's a one bowl recipe. No mixers or beaters needed.
- Only simple ingredients needed that you most likely have in your pantry.
- No need to melt chocolate. This delicious brownie recipe is made with cocoa powder.
- These brownies can be prepared and in the oven in no time-I'm talking less than 5 minutes. The recipe is that easy!
- They have the right amount of chewy, fudgy and crackly top in every bite.
- The easiest recipe to make for the chocolate lovers out there!
- Taste so much better than any boxed brownie mix!
Classic Brownie Recipe Ingredients
- Salted Butter
- Unsweetened Cocoa Powder
- Instant Coffee Granules
- White Sugar
- Large Eggs
- Pure Vanilla Extract
- Unbleached All Purpose Flour
- Salt
- Semi-Sweet Chocolate Chips
Substitution Suggestions
- Salted Butter: Feel free to use unsalted butter. I suggest adding ½ teaspoon of salt to the batter if you do.
- Unsweetened Cocoa Powder: If you prefer a darker and richer flavor in your basic brownie then you can use dark chocolate cocoa powder or dutch process cocoa powder. Those will yield a much richer brownie that is a bit more dense.
- Instant Coffee Granules: This ingredient is optional but I highly recommend using it. It really highlights and brings out the flavor of the chocolate. You can also use instant espresso powder.
- Pure Vanilla Extract: I say this with every recipe that uses vanilla extract. The pure extracts are best. Imitation extracts leave an unpleasant after taste in baked goods.
- All Purpose Flour: If you like you can use white whole wheat flour or whole wheat flour. The brownies will be a touch more dense with a slight nutty flavor. They will still be absolutely delicious! I make brownies with wheat flour a lot and they are still divine!
- Semi-Sweet Chocolate Chips: You can use your favorite chocolate! Milk chocolate chips will make the brownies a bite more sweet. Dark chocolate chips will make them more rich and decadent. Peanut butter chips or white chocolate chips will add some fun flavors to the brownies. Use your favorite!

How to Make Homemade Chewy Brownies
- Preheat oven to 350°F and line a 9x13 baking dish with parchment paper or grease well with non-stick cooking spray.
- Then, melt butter in a large microwave safe bowl or in a medium size pot over medium-low heat.
- Whisk the cocoa powder and instant coffee granules into the melted butter until smooth.


- Next, add the granulated sugar and whisk well.
- Whisk in the eggs and vanilla extract, until the batter is light and airy.
- Switch to a rubber spatula or wooden spoon and stir in the dry ingredients: all purpose flour and salt just until combined and there are no more white streaks of flour.
- Add the chocolate chips and fold them into the brownie batter.


- Spread brownie batter into prepared pan. You can add some extra chocolate chips to the top of the brownies for a pretty presentation.
- Bake brownies for 25-30 minutes. Test to see if brownies are done by inserting a toothpick in center of brownies. The toothpick should have some damp crumbs or gooey brownie on it but it shouldn't look wet or raw.
- Let brownies cool at least 30 minutes before slicing and serving.

Love Brownies? Here are some more homemade brownie recipes that are out of this world:
Storing Classic Homemade Brownies
Storing: These classic brownies are best stored at room temperature in an airtight container. They'll last up to 5 days, but I'm assuming they'll be gone the day you make them!
Freezing: These fudgy brownies freeze great. Place them in a freezer safe airtight container or zip top bag between layers of wax paper. Or you can individually wrap each brownie in plastic wrap and then place in freezer safe container or zip top bag. Don't forget to label and date! Freeze brownies for up to 4 months.
Thawing: Remove brownie from freezer, unwrap if needed and let thaw on the counter for at least 30 minutes.

Tips for the Classic Homemade Brownies
- Gather all your ingredients before you start baking. It is so much easier to bake when all your ingredients are ready. Plus, there is less room for error. Like forgetting an essential ingredient. I'm not saying I've done this, however, I am speaking from experience!
- Always read the recipe from start to finish before you start. Again, I am speaking from experience.
- After adding the eggs, whisk like your life depends on it. The more airy the batter gets, the more crackly top you'll create.
- Make sure to fluff your flour a bit before you measure it. When it sits for periods of time it becomes packed. To fluff your flour, just scoop it and dump it a few times or whisk it and then measure it out and level off.
- Add some chocolate chips on top of the batter before baking for even more chocolate indulgence.
- For easy removal, line the baking dish with parchment paper. This will allow you to remove the entire pan of brownies all at once and then slice easily.
- For the best brownies and best results don't overbake the brownies, you want them to turn out fudgy.
- Let the brownies cool some before slicing. For perfect clean cuts, cool completely. Slice brownies with a plastic knife in one smooth cut, do not use a sawing motion to cut the brownies. One smooth cut will create nice smooth edges on the brownies when serving, keeping them looking pretty. Wipe knife clean after each cut.
FAQs About Brownie Recipe with Cocoa Powder
Brownies become fudgy by using less flour, more butter and no leavening agent (baking soda or baking powder). The temperature and time you bake your brownies will also play into how fudgy they end up.
A toothpick or cake tester are your friends when testing for doneness. Stick the toothpick in the center of the brownies and if it comes out with some damp crumbs or gooey brownie the brownies are done. If there is still wet looking batter on the toothpick keep baking and test brownies again.
Most people will say that aluminum pans are the best for brownies and baked goods because they conduct heat the most evenly. They are right too, aluminum is the way to go when baking cakes and cookies. I like baking brownies in glass pans and all the professional bakers will probably argue with me about it. I like glass pans because the center of the brownies are guaranteed to be fudgy. This happens because the glass takes longer to conduct heat. I do agree with the professionals that dark non-stick pans are not good for baking. They conduct heat too fast and aggressively that can burn the bottom and edges of your baked goods. If you use an aluminum metal pan or glass dish you will end up with tasty brownies.

More Chocolate Dessert Recipes:
- Oatmeal Fudge Bars
- Brookie Bars
- Chocolate Brownie Cookies
- Mexican Brownie Skillet
- Gourmet Chocolate Peanut Butter Chip Cookies
- Chocolate Cupcakes with Chocolate Buttercream
- Double Dark Chocolate Chip Cookies
- Chocolate Sour Cream Baked Donuts
- Double Chocolate Chip Cookies
- Chocolate Sugar Cookies
- Chocolate Zucchini Cake
Did you make this recipe? Rate it!
If you enjoyed this recipe give it a ⭐⭐⭐⭐⭐ rating in the comments below. It really helps the recipe stand out and I appreciate the feedback to make recipes everyone will enjoy.

Classic Homemade Brownies
Ingredients
- 1 cup salted butter
- 1 cup unsweetened cocoa powder
- 1 teaspoon instant coffee granules
- 2 cups sugar
- 4 large eggs
- 1 tablespoon pure vanilla extract
- 1 cup unbleached all purpose flour
- ½ teaspoon salt
- ½ cup semi-sweet chocolate chips
Instructions
- Preheat oven to 350°F and line a 9x13 baking dish with parchment paper or grease well with nonstick cooking spray.
- In a large microwave safe bowl, melt butter. Or melt in pot over medium-low heat, once melted remove from heat.
- To the melted butter add: cocoa powder and instant coffee. Whisk until completely smooth.
- Whisk in sugar until well combined.
- Whisk in eggs and vanilla until the batter is light and airy.
- Switch to a rubber spatula or wooden spoon and stir in flour and salt just until combined and there are no more white streaks of flour.
- Fold in chocolate chips.
- Evenly spread into prepared pan. Top with extra chocolate chips or chunks if desired.
- Bake for 25-30 minutes until the center is set and toothpick comes out with damp crumbs.
Leave a comment