
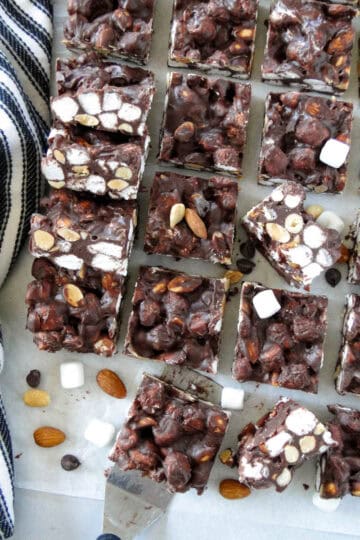
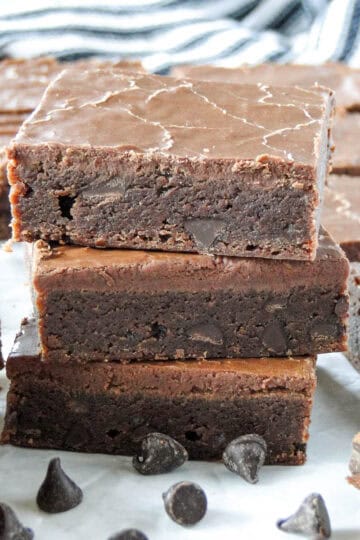
Rocky Road Brownies are going to surpass all your expectations! They have a rich and fudgy brownie base and are covered with all the classic rocky road flavors of marshmallows, chocolate chips and roasted peanuts.

This post may contain affiliate links. As an Amazon Associate I earn from qualifying purchases at no extra cost to you. Click HERE to read my policies.
This post was originally posted on 12/30/2020 and updated on 02/5/2025.
Why We Love Rocky Road Brownies
- A simple one bowl recipe.
- No need to melt chocolate. This delicious brownie recipe is made with cocoa powder.
- These brownies can be prepared and in the oven in no time-I'm talking less than 5 minutes. The recipe is that easy!
- The chewy and fudgy brownie layer has the perfect texture and is topped with a gooey marshmallow layer.
- The easiest recipe to make for the chocolate lovers out there!
- Taste so much better than any boxed brownie mix!
- A crowd pleaser and great for entertaining. Perfect for holidays, special occasions, parties or pot lucks.
- Chocolate, marshmallows and peanuts are a divine combination!
Rocky Road Brownies Recipe Ingredients
- Salted Butter
- Unsweetened Cocoa Powder
- White Sugar
- Pure Vanilla Extract
- Large Eggs
- Unbleached All Purpose Flour
- Mini Marshmallows
- Semi-Sweet Chocolate Chips
- Roasted & Salted Peanuts
Substitution Suggestions
- Salted Butter: Feel free to use unsalted butter, I suggest adding a ½ teaspoon of salt to the brownie batter.
- Pure Vanilla Extract: I strongly recommend to always use pure extracts. The imitation extracts are fake and chemically made and can leave an unwanted aftertaste in your baked goods.
- All Purpose Flour: Whole wheat flour and white whole wheat flour can be substituted for the all purpose flour. You can also use half whole wheat flour and half all purpose flour, it adds a nice flavor to the brownies.
- Mini Marshmallows: I don't recommend using large marshmallows unless you cut them into quarters. You can use marshmallow fluff, but it's a bit messy and a hassle to spread over the brownies. It tastes amazing though!
- Semi Sweet Chocolate Chips: Use your favorite chocolate. Dark chocolate chips or milk chocolate chips are good options. You could also use butterscotch chips or peanut butter chips.
- Peanuts: You can use cashews, pecans, walnuts or almonds. Whichever is your favorite!

How to Make Rocky Road Brownies
- First, preheat the oven to 350°F and line a 9x13 baking dish with parchment paper or grease it well with nonstick cooking spray.
- Melt butter in a large microwave safe bowl or in a medium size pot over medium-low heat.
- Add the cocoa powder to the melted butter and whisk until smooth.
- Then, whisk in granulated sugar until fully incorporated.
- Now add the eggs and vanilla extract and whisk until airy and everything is incorporated.


- Switch to a rubber spatula or wooden spoon and stir in the all purpose flour just until it is combined.
- Spread the brownie batter out evenly into prepared baking dish.
- Bake the brownies in preheated oven for 20-22 minutes. You do not want to fully bake the brownies, because they are going to bake for another 5 minutes after the toppings are added.
- Immediately add the marshmallows in an even layer on top of the slightly under baked brownies, followed by a sprinkle of chocolate chips and peanuts.


- Return the brownies to the oven and bake for another 5-7 minutes until the marshmallows are puffy and slightly golden brown.
- Let the brownies cool awhile and then slice and serve.

Do you love chocolate? Brownies? Here are some more fabulous brownie recipes that are absolutely delightful!
Storing Rocky Road Brownies
Storing: Store the cooled brownies in an air tight container. Keep them in a cool dry place and they'll last at least a week, if not longer. If you notice the leftover brownies starting to get a little dry, add a piece of bread or a flour tortilla to the container. It will add moisture back into the brownies.
Freezing: These rocky road brownies freeze perfectly! Place the baked and cooled bars in a freezer safe airtight container in single layers, between pieces of wax paper. Or you can individual wrap them in plastic wrap and then place in a freezer safe container or zip top bag. Label, date and freeze. The brownies will last 3-4 months in the freezer.
Thawing: When you are ready to enjoy a brownie, unwrap the brownie if needed, then simply let one or more thaw at room temperature for at least 30 minutes.

Heather's Favorite Tools for this Recipe
- These nestled mixing bowls are my favorite for prepping ingredients.
- Long ago, I used to be a Pampered Chef consultant and I still prefer their baking tools and pans to any others. They're baking pans are the ones I primarily use. Find yourself a consultant, host a party and treat yourself to a set.
- I really like these Pyrex baking dishes too!
- An offset spatula is my favorite tool to use for evenly spreading the batter into the baking dish.
- This ice cream scoop is the best. It makes dishing out hard ice cream easily.
- Pre-cut parchment paper is a life saver and so easy. No cutting my fingers!
How to Get Clean Cuts
- Let the brownies cool almost completely.
- Use a plastic knife (Pampered Chef makes a good one) or a disposable plastic knife.
- No plastic knife? Use a metal knife sprayed with cooking spray or dipped in water and wipe off after each cut.
- Slice with one smooth cut, do not use a sawing motion to cut the brownies.

Tips for Rocky Road Brownies
- Line the baking dish with parchment paper leaving an inch overhang on the long edge so you can easily lift the bars out of the dish once cooled.
- If you are in a real hurry you can use a boxed brownie mix for a 9x13 pan. However, the from scratch recipe tastes so much better!
- Use room temperature ingredients. It helps the batter come together better.
- Always fluff your flour and then spoon and level it to measure. Doing this will prevent too much flour from being added and ultimately making the brownies too dense and dry.
- After adding the eggs to the brownie batter, whisk like your life depends on it. The more airy the batter gets, the better.
- Let brownies cool completely before slicing.
- For more chocolate flavor you can add ½ cup of semi-sweet chocolate chips to the brownie batter.
- Warm the bars and serve them with a scoop of vanilla ice cream for a delightful dessert!
FAQs About Brownies
Brownies become fudgy by using less flour, more butter and no leavening agent (baking soda or baking powder). The temperature and time you bake your brownies will also play into how fudgy they end up.
A toothpick or cake tester are your friends when testing for doneness. Stick the toothpick in the center of the brownies and if it comes out with some damp crumbs or gooey brownie the brownies are done. If there is still wet looking batter on the toothpick keep baking and test brownies again.
Most people will say that aluminum pans are the best for brownies and baked goods because they conduct heat the most evenly. They are right too, aluminum is the way to go when baking cakes and cookies. I like baking brownies in glass pans and all the professional bakers will probably argue with me about it. I like glass pans because the center of the brownies are guaranteed to be fudgy. This happens because the glass takes longer to conduct heat. I do agree with the professionals that dark non-stick pans are not good for baking. They conduct heat too fast and aggressively that can burn the bottom and edges of your baked goods. If you use an aluminum metal pan or glass dish you will end up with tasty brownies.

More Dessert Bar Recipes:
- Brookie Bars
- Peanut Butter and Jelly Bars
- Lemon Bars
- Cookies and Cream Cheesecake Bars
- S'mores Bars
- Sugar Cookie Bars
- Oatmeal Fudge Bars
- Rhubarb Custard Bars
- Chocolate Chip Cookie Bars
- Strawberry Rhubarb Bars

Rocky Road Brownies
Ingredients
- 1 cup salted butter, melted
- ½ cup unsweetened cocoa powder
- 2 cups sugar
- 4 large eggs
- 1 tablespoon pure vanilla extract
- 2 cups unbleached all purpose flour
- 4 cups mini marshmallows
- ½ cup semi-sweet chocolate chips
- ½ cup dry roasted salted peanuts
Instructions
- Preheat oven to 350°F and line a 9x13 baking dish with parchment paper or grease it well with non stick cooking spray.
- In a large bowl, whisk together melted butter and cocoa powder until smooth.
- Whisk in the sugar until fully combined.
- Add eggs and vanilla, whisk until smooth and airy.
- Stir in flour just until it is incorporated and there are no more white streaks.
- Pour batter into prepared baking dish and spread out evenly.
- Bake brownies for 20-22 minutes. (Slightly under baking)
- Layer marshmallows, chocolate chips and peanuts on top of brownies.
- Bake for another 5-7 minutes until the marshmallows are puffy and slightly golden brown.
- Let brownies cool, then slice and serve!


Leave a comment