
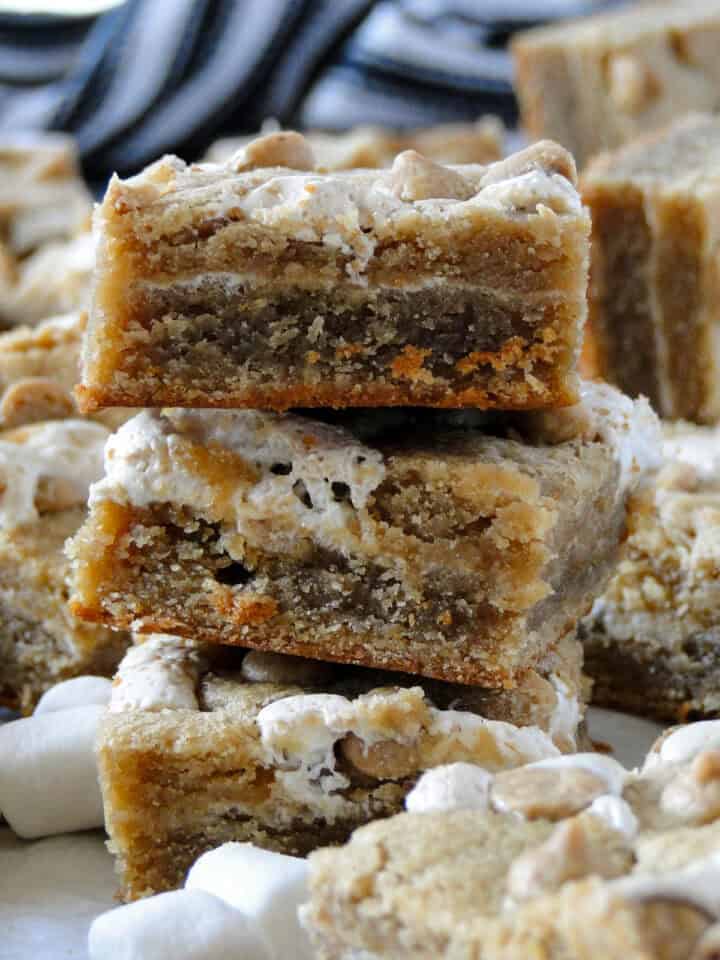
Fluffernutter Bars are the ultimate treat for peanut butter and marshmallow lovers. These homemade cookie bars are soft yet chewy with gooey layers that melt together in every bite. They’re easy to make and guaranteed to disappear fast whenever you bake a batch!

This post may contain affiliate links. As an Amazon Associate I earn from qualifying purchases at no extra cost to you. Click HERE to read my policies.
Why We Love These Fluffernutter Bars
- They’re soft yet chewy with that perfect mix of peanut butter and marshmallow in every bite.
- Easy to make with simple ingredients and no fancy tools required.
- A fun twist on the classic fluffernutter sandwich that everyone will recognize and love.
- They stay soft for days, so you can bake ahead and still enjoy that fresh baked texture.
- Kids and adults both can’t resist the gooey, sweet peanut butter combo!
- Perfect for bake sales, lunchboxes, or whenever you’re craving something sweet and nostalgic.
What is a Fluffernutter?
A fluffernutter is a peanut butter and marshmallow sandwich. It's a sweet treat with peanut butter spread on one slice of bread and marshmallow fluff spread on the other. Take it to the next level and make it grilled! So good!
Fluffernutter Recipe Ingredients
- Salted Butter
- Creamy Peanut Butter
- Brown Sugar
- Large Eggs
- Pure Vanilla Extract
- Salt
- Unbleached All Purpose Flour
- Marshmallow Creme (Fluff)
- Peanut Butter Chips
Substitution Suggestions
- Salted Butter: You can use unsalted butter, but I suggest adding an additional ½ teaspoon of salt to the dough.
- Peanut Butter: I only tested this recipe with creamy peanut butter. I like JIF Natural. I would think chunky peanut butter would work, but I didn't try it.
- Pure Vanilla Extract: I like pure extracts best as they give the best flavor.
- All Purpose Flour: White whole wheat flour or whole wheat flour will work. The texture will be a slight more dense and they'll be darker in color, but they are still yummy.
- Marshmallow Creme: I only made this recipe with the stuff from the jar. If you want to try a homemade version you can, I'm not sure how it will turn out though.

How to Make Fluffernutter Bars
- First, preheat oven 350°F and line a 9x13 baking dish with parchment paper or grease it well with nonstick cooking spray.
- In the bowl of a stand mixer, or a large bowl with hand mixer, cream together the softened butter, peanut butter and brown sugar until light and fluffy. This will take 1-2 minutes.
- Next, add the eggs, one at a time beating well after each addition.
- Now mix in the vanilla extract.
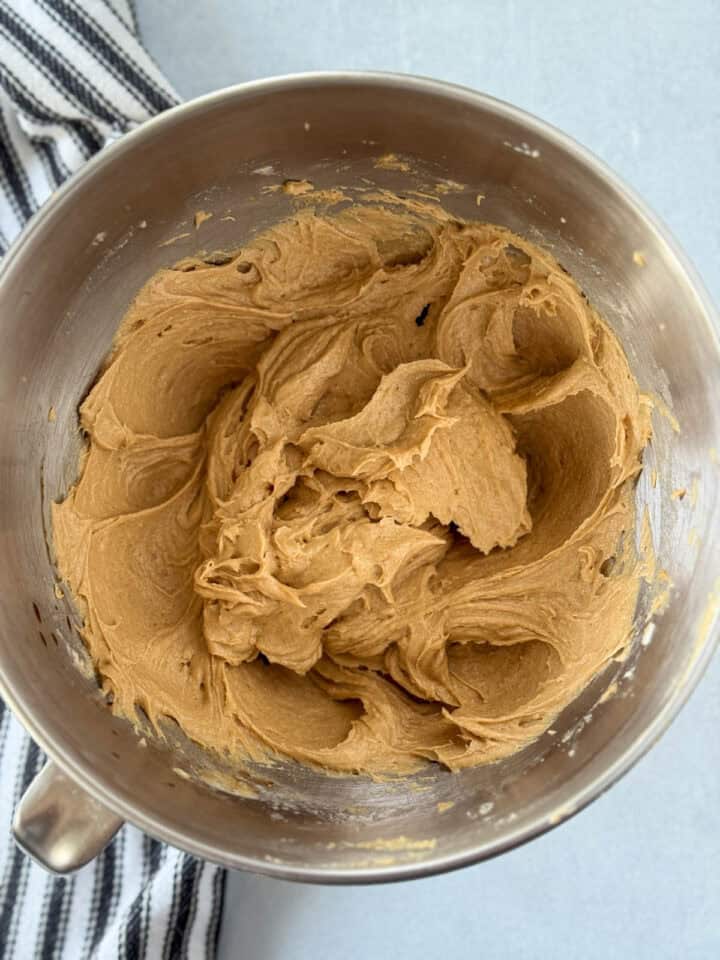

- Add the dry ingredients: salt and all purpose flour. Mix on low speed just until everything is combined.
- Take about ⅔rds of the dough and spread it out into an even layer in the prepared baking dish.
- Then spread the marshmallow fluff over top of the dough. An offset spatula works best for this to spread it out evenly.


- Now take chunks of the remaining dough and gently flatten them and lay them on top of the marshmallow fluff letting some of the fluff peek through.
- Sprinkle the peanut butter chips over top of it all and gently pat them down.
- Bake the bars in preheated oven on center rack for 30-35 minutes until golden brown, set and no longer wet looking.
- Let bars cool completely before slicing.

If you love cookie bars don't miss these other delicious recipes!
Storing Fluffernutter Bars
Store these fluffernutter bars in an airtight container in a cool dry place. It is best to not stack the bars. If you need to, stack them between layers of wax paper. The marshmallow will stick just a little bit. These bars can also be stored in the fridge. Since the bars are made with marshmallow creme they don't get too sticky or hard.
Heather's Favorite Tools for this Recipe
- My KitchenAid Stand Mixer is my most favorite kitchen tool! It's the best tool ever for making bars, cookies, bread, frostings and so many other things.
- These nestled mixing bowls are my favorite for prepping ingredients.
- An offset spatula works best for spreading out the marshmallow fluff.
- Long ago, I used to be a Pampered Chef consultant and I still prefer their baking tools and pans to any others. They're baking pans are the ones I primarily use. Find yourself a consultant, host a party and treat yourself.
- I really like these Pyrex baking dishes for baking too.
Tips for Fluffernutter Bars
- Use room temperature ingredients. It helps the dough come together better, and also helps with even baking.
- Always fluff your flour and then spoon and level it to measure. Doing this will prevent too much flour being added and ultimately making the cookie base too dry and crumbly.
- When serving these bars, let them cool and set for at least 4-6 hours. They'll be easier to slice and serve.
- For clean slices, let the bars completely cool before slicing. To speed up the process, you can chill the bars in the fridge for a few hours. When slicing the bars, clean the knife with hot water after each slice.

More Peanut Butter Recipes:
- Old Fashioned Peanut Butter Cookies
- Peanut Butter Brownie Bars
- No Bake Peanut Butter Bars
- Peanut Butter Muffins
- Scotcharoos
- Chocolate Peanut Butter Whoopie Pies
- Peanut Butter Swirl Brownies
- Ultimate Peanut Butter Cookies
- Gourmet Chocolate Peanut Butter Chip Cookies
- Peanut Butter Banana Chocolate Muffins
Did you make this recipe? Rate it!
If you enjoyed this recipe give it a ⭐⭐⭐⭐⭐ rating in the comments below. It really helps the recipe stand out and I appreciate the feedback to make recipes everyone will enjoy.

Fluffernutter Bars
Ingredients
- 1 cup salted butter, softened
- 1 cup creamy peanut butter
- 1½ cups light brown sugar, lightly packed
- 2 large eggs
- 1 tablespoon pure vanilla extract
- ½ teaspoon salt
- 2¾ cups unbleached all purpose flour
- 7 ounce marshmallow creme
- ¼ cup peanut butter chips
Instructions
- Preheat oven 350°F and line a 9x13 baking dish with parchment paper or grease it well with nonstick cooking spray.
- In the bowl of a stand mixer, or a large bowl with hand mixer, cream together the softened butter, peanut butter and brown sugar until light and fluffy. This will take 1-2 minutes.
- Add the eggs, one at a time beating well after each addition.
- Mix in the vanilla extract.
- Add the salt and all purpose flour. Mix on low speed just until everything is combined.
- Take ⅔ of the dough and press it out into an even layer in the prepared baking dish.
- Spread the marshmallow fluff over top of the dough with an offset spatula.
- Take chunks of the remaining dough and gently flatten them, and lay them on top of the marshmallow fluff letting some of the fluff peek through.
- Sprinkle the peanut butter chips over top of it all and gently pat them down.
- Bake the bars in preheated oven on center rack for 30-35 minutes until golden brown, set and no longer wet looking.
- Let bars cool completely before slicing.


Leave a comment