This post may contain affiliate links. As an Amazon Associate I earn from qualifying purchases at no extra cost to you. Click HERE to read my policies.
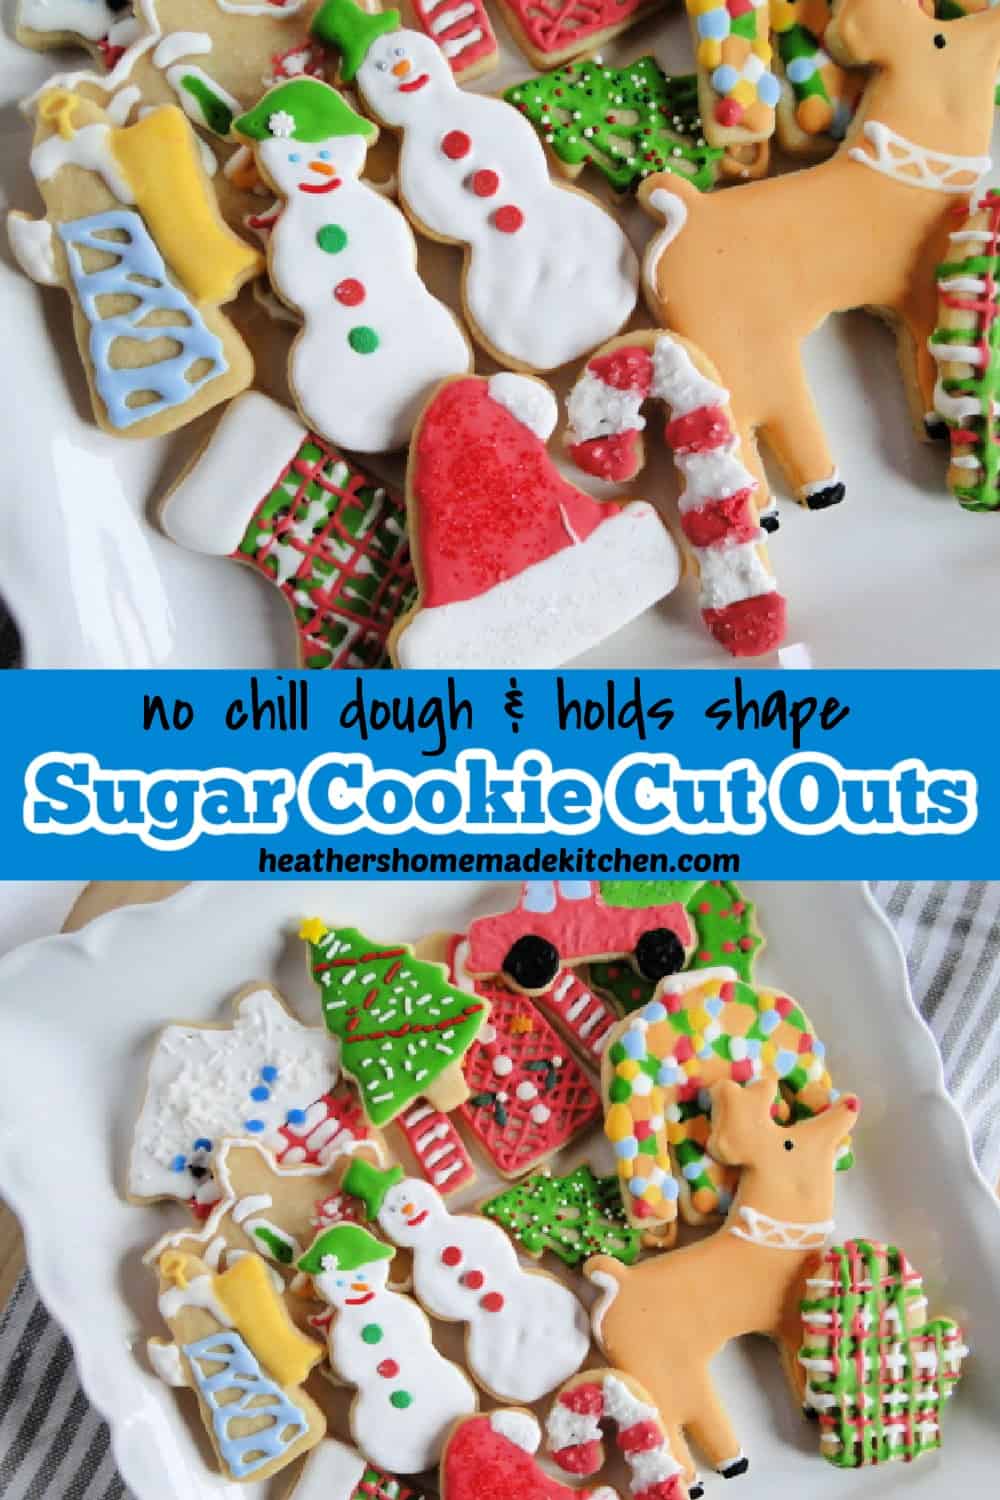
These Sugar Cookie Cut Outs are the perfect holiday treat. They require no chilling and turn out soft, buttery and holding their shape. Plus, these cookies taste delightful plain or decorated.
Who doesn't love a great sugar cookie cut out for Christmas? These are Santa's favorite after all! This recipe is so simple and there is no chilling needed, which is why I really love it. I had my great aunt's sugar cookie cut out recipe and I just tweaked a bit to make it easier and not as time consuming. Either way cut outs are a bit time consuming, but it is a fun thing to consume your time with!
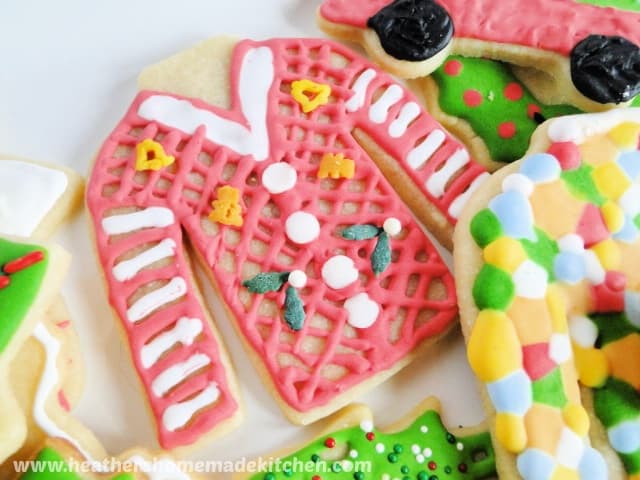
These sugar cookie cut outs have became a family tradition in our family and the kids look forward to it at every holiday! The kids help cut the cookies and decorate. Can you tell? It wouldn't be the same without the adorable messy cookies! My husband even gets into the decorating! Can you tell by all the green and yellow cookies? Yeah, unfortunately he is a Green Bay Packer Fan. Please pray for him!
This post was originally posted on 12/19/2015 and updated on 12/11/2020.
Simple Sugar Cookie Ingredients
- Salted Butter
- Sugar
- Egg
- Pure Vanilla Extract
- Pure Almond Extract
- Baking Powder
- Unbleached All Purpose Flour
For the Simple Cookie Glaze:
- Powdered Sugar
- Milk
For the Royal Icing:
- Powdered Sugar
- Meringue Powder
- Water
Do I have to use Almond Extract in Sugar Cookie Cut Outs?
No, you can substitute it with more vanilla extract. The almond extract gives the cookies just a hint of the flavor, and I think it really helps balance all the sweetness from the cookies and glaze.

How to Make the Best Sugar Cookie Cut Outs
Step 1: Make the Dough
In a stand mixer or large bowl with hand beater, cream together the butter and sugar until fluffy. Add egg and beat well. Next add in the vanilla and almond extracts and beat to combine everything well. Add the baking powder and 1 cup of the flour. Mix on low just until combined. Now, add the remaining flour ½ cup at a time and mix just until combined. If the dough starts to get too stiff for the mixer, wet your hands and mix the dough on the counter or table. Wetting your hands will keep the dough from sticking to you.
Step 2: Roll and Cut
Divide the dough into workable batches on a pastry mat or very lightly floured surface. Roll the dough out to ¼ inch thickness and cut with desired cookie cutters. Place cookies on ungreased cookie sheets about 2 inches apart.
Step 3: Bake and Cool
Bake the cookies in a preheated 350° oven for 6-8 minutes. The longer you bake them, the crispier the cookies will be. I prefer to bake my cookies closer to the 6 minute mark. Let cookies cool 4-5 minutes on pan then transfer to a cooling rack.
How to Decorate Sugar Cookie Cut Outs
To make and color a glaze: Mix together the powdered sugar and milk until you reach your desired consistency, adding more sugar to make it stiffer or adding more milk to thin it out. I try to get the consistency just a teeny bit thinner than Elmer's glue. Add the glaze to a quart size zip top bag, add your food coloring and let the kids mush it until its colored. Or you can color the glaze in a bowl and add it to piping bags. Make a very small cut in the corner of the bag and decorate cookies as desired using lots of different fun sprinkles and decorations. Let cookies sit a few hours so the icing can set and harden.
To make and color royal icing: Using a stand mixer or hand beaters, whisk together powdered sugar, meringue powder and water on high speed for about 2 minutes. The royal icing should slowly drizzle off the whisk and blend smoothly back into the bowl. If the icing is too thick, add a touch more water and if the icing is too thin, add a bit more powdered sugar. Separate the icing into separate bowls, add desired colors and mix it together well. Add icing to piping or zip top bag and decorate as desired.
How to Store and Freeze Decorated Sugar Cookies
Once the frosting is set and hardened, layer cookies in an air tight container between wax paper. Cookies will last a week on the counter, if they start to dry out a bit, add a piece of bread to the container.
These cookies freeze well too. Place the cookies in a freezer safe container between layers of wax paper. Cookies will last 3-4 months in the freezer. To thaw, let the cookies rest at room temperature for a few hours. Note*** I have noticed sometimes the colors in the icing will fade after thawing, but the taste and texture of the cookie is not altered.

More Holiday Cookies to enjoy!
- Frosted Pumpkin Drops
- Peanut Butter Temptation Cookies
- Italian Almond Cookies
- Chocolate Peppermint Drops
- Soft Pumpkin Chocolate Chip Cookies
- Gingerbread Men & Women
- Spritz Butter Cookies
- Sugar Cookie Bars
- White Chocolate Chip Pumpkin Cookies
Give these sweet and easy Sugar Cookie Cut Outs a try and let me know how you and the family loved them in the comments below and give the recipe a star rating! Pictures encouraged on Instagram with the hashtag #heathershomemadekitchen You can also follow me on Social Media to see what other crazy things my family and I are doing! If you like what you see, please share with your friends and family!
Don’t forget to pin the recipe for later!

Sugar Cookie Cut Outs
Ingredients
- 1 cup salted butter, softened
- 1 cup sugar
- 1 large egg
- 1 teaspoon pure vanilla extract
- ¼ teaspoon pure almond extract
- 2 teaspoons baking powder
- 3 cups unbleached all purpose flour
Glaze
- 2 cups powdered sugar
- 3-4 tablespoons milk
- preferred food coloring
Royal Icing
- 4 cups powdered sugar
- 3 tablespoons meringue powder
- 10 tablespoons water
- preferred food coloring
Instructions
- Preheat oven to 350°.
- In a stand mixer or large mixing bowl with hand beater, cream the butter and sugar until light and fluffy.
- Add egg and beat well.
- Add vanilla and almond extracts and mix until combined.
- Add baking powder and 1 cup flour, mix on low just until combined.
- Add remaining flour ½ cup at a time, then mix on low. If the dough gets too stiff for your mixer, wet your hands and mix the rest together on the counter or table.
- No need to chill the dough. If perhaps you need to, let it rest at room temperature for 15 minutes or so before rolling out and cutting.
- Divide dough into workable batches.
- On a pastry mat or very lightly floured surface, roll dough out to ¼ inches.
- Cut with desired cookie cutters. Place on a ungreased baking sheet about 2 inches apart.
- Bake for 6-8 minutes. Mine only take 6 minutes, the longer you bake them the crispier the cookie will be. I prefer mine on the softer side.
- Let rest on pan for about 4-5 minutes and then transfer to a cooling rack.
For Glaze
- Pour desired amount into zip top bags. Add desired food colorings, zip bags closed and let the kids mush them to create colors. I make about 4-5 different colors. Or you can color the icing in separate bowls and add it to piping bags.
- When ready to use the icing, do a small cut on the corner of the bags and decorate cookies as desired.
Royal Icing
- With a stand mixer or hand beater, whisk the powdered sugar, meringue powder and water on high for about 2 minutes.
- The royal icing should slowly drizzle off the whisk and blend smoothly back into the bowl. If the icing is too thick, add a touch more water and if the icing is too thin, add a bit more powdered sugar.
- Separate the icing into separate bowls, add desired colors and mix it together well. Add icing to piping or zip top bag, snip corners and decorate as desire.
Leave a comment